Setting up and Testing your Grandstream GXP2000
This Note contains the following Sections:
Step 2: Obtain the IP address of your Grandstream GXP2000 phone
Step 3: Retrieve your personal extension details
Step 5: Configure your handset account
Objectives
Use this guide to:
- Setup a Grandstream GXP2000 handset for a dmSwitchboard12 extension
By the end of this Note, you should:
- Have configured your Grandstream GXP2000 for a dmSwitchboard12 extension
- Be able to make and receive internal calls using your Grandstream GXP2000 phone
- Be able to make and receive external calls using your Grandstream GXP2000 phone, (depending on your dmSwitchboard12 plan)
Duration
These tasks should take you approximately 20 minutes.
Related content
You will need to read Note 5035 in order to complete these tasks. It tells you how to retrieve your credentials from the dmSwitchboard12.
These instructions will tell you when to open the Note.
Firmware version
These instructions have been written to Firmware Version 1.1.6.46. Note that they may not work with other versions.
Theory
This section deals with a typical setup for the Grandstream GXP2000.
The VoIP Phone is connected to an ADSL router via an RJ45 or CAT5 cable. This lets it connect to the internet, and so to your dmSwitchboard12.
The VoIP phone has Personal Extension Credentials. These tell it how to reach the switchboard, via the internet, and how it is permitted to use it.
It is these credentials that you will be entering into the handset in the following steps.
Pre-requisites
You need all of the following to complete these instructions:
- A dmSwitchboard12 account
- An active, configured dmSwitchboard12 plan
- An internet connection
- An internet router
Note: You need a router that is connected to an ADSL line. A USB modem will not work. - A Grandstream GXP2000 VoIP phone
Setup data
The following table lists:
- Data that you will need before you start the procedure and
- Data that will be provided during the procedure
Data that you need to hand before you start is labelled Required in the Rule & Origins Column. This may include information published in the User Guide such as logins and passwords.
Data that will become available during the procedure itself is labelled Generated in the Rule & Origins Column. Note: You should make a note of the Generated data as you will need it later in the procedure.
If the data conforms to a particular rule, or set of rules, this is highlighted in the Rule and Origin column. An example might be that any email address must be a valid email address.
| Data Name | Usage | Example | Rule & Origins |
|---|---|---|---|
| dmClub Login Details | |||
| <DMID> | The dmClubID is usually the email address with which you signed up, it's shown at the top of your Clubhouse. | fred@smithco.com | Required |
| <DM Password> | The password that you use to sign into your clubhouse. If your browser is set to remember this, you will not need it. | V3rr1S3cr3t | Required |
| Personal Extension Details | |||
| <Switchboard Account Number> | The account number of your Switchboard service | 004-0027 | Required |
| <My Extension> | The extension number for which you are setting this phone up | 302 | Required |
| Personl Extension Credentials | |||
| <SIP Proxy and Host> | The internet address for your Switchboard. Your handset uses this to find the switchboard. | 004-0027.sb12.dmclub.net | Generated. You retrieve this in Step 3, below. |
| <SIP Username> | The username that the phone gives to the dmSwitchboard | 0027307 | Generated. You retrieve this in Step 3, below. |
| <SIP Password> | The secret password that the phone gives to the switchboard | DFET-NK5R-SLPA | Generated. You retrieve this in Step 3, below. |
| Handset Details | |||
| <IP Address> | Used to access the handset's configuration page | 192.168.3.213 |
Required. |
| <System Password> | Used to Login to the configuration window | admin |
Required. |
Step 1: Connect the handset
Follow the basic setup for your Grandstream GXP2000 handset, as detailed in the phone’s User Manual.
You need to connect the VoIP phone to your ADSL router.
Step 2: Obtain the Grandstream GXP2000's IP address
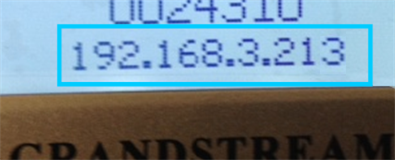
When the GrandstreamGXP2000 is switched on and connected to your ADSL router, the phone displays its IP address, shown here in a blue box.
The IP address is in the format XXX.XXX.XXX.XXX where XXX stands for a number between 0 and 255.
Write down this number. You will need it in Step 4, below.
Step 3: Retrieve your personal extension credentials
Before you can begin, you need to have the credentials for each extension that is to be connected to a Grandstream phone. These credentials will be different for each extension.
Full instructions can be found here. These instructions will open in a new window and you should be able to complete them in less than five minutes.
When you have retrieved all of the credentials that you require, continue from Step 4, below.
Step 4: Log in to the handset
To log into the GrandsteamGXP2000 phone, follow these steps:
a) Open a browser, such as Internet Explorer, Firefox or Google Chrome.
b) Type the phone’s IP address (retrieved in Step 2, above) into the browser's address bar.
Type it exactly as it is shown on the phone’s display. Press ENTER. The Grandstream Device Configuration Login window is displayed.

d) Type the device's Password into the Password field (1) (the default password is ‘admin’) and click LOGIN (2). The Grandstream Device Configuration main window is displayed.
Step 5: Configure your Handset account
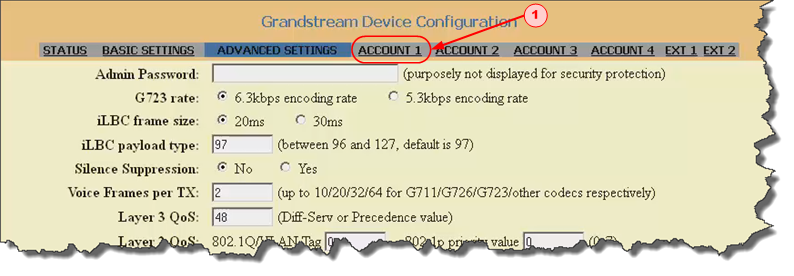
On the Grandstream Device Configuration main window, click ACCOUNT 1 (1).

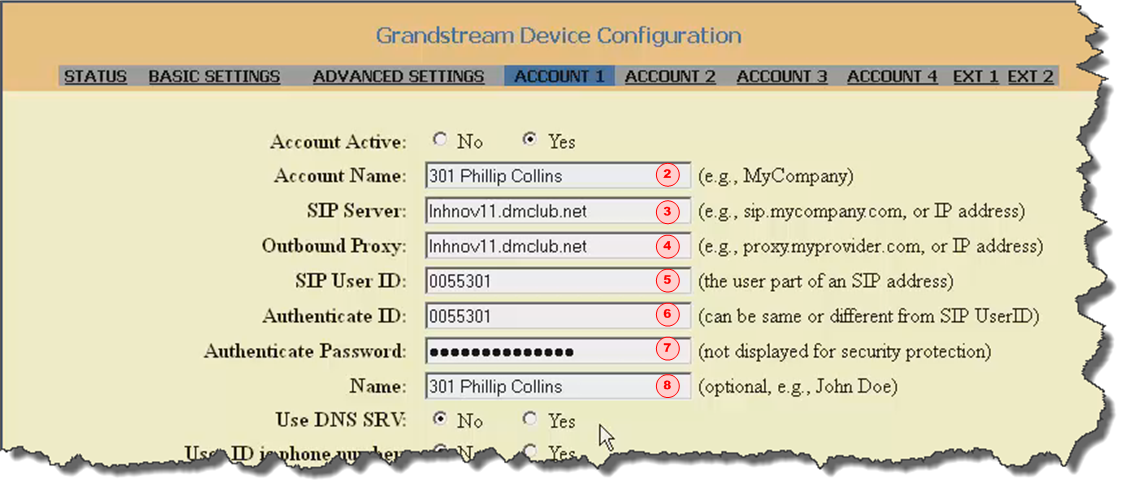
The Account 1 screen is displayed. You are only concerned with the top few fields, as shown in this screen shot.

|
Send DTMF: [ ] in-audio [ X ] via RTP (RFC2833) [ ] via SIP INFO
|
You will need the credentials that you retrieved in Step 3 for this step.
Complete the fields as follows:
a) In the ACCOUNT NAME field (2), type the required extension number followed by the name of the extension’s owner.
b) In the SIP SERVER field (3), type your <SIP Proxy/host>details.
c) In the OUTBOUND PROXY field (4), type your <SIP Proxy/host> details.
d) In the SIP USER ID field (5), type your <SIP Username>.
e) In the AUTHENTICATE ID field (6), type your <SIP Username, exactly as it was displayed on your credentials
f) In the AUTHENTICATE PASSWORD field (7), type your <SIP Password> exactly as it is in the credentials.
g) In the NAME field (8), type the required extension number followed by the name of the extension’s owner.
h) Set the SEND DTMF field to VIA RTP (RFC2833).
j) When you have completed all of the required fields, scroll to the foot of the screen and click UPDATE (9).

The Configuration Changes screen is displayed.
Step 6: Confirm the changes
To confirm your changes, follow these steps:
a) On the Configuration Changes screen, click REBOOT (1).

The Device Rebooting... screen is displayed
b) On the Device Rebooting... screen, once once 30 seconds has passed, click RELOGIN (2). This should give the device time to reset its configuration.
c) You are returned to the Grandstream Device Login Screen. Your changes are now complete.
Step 7: Make some test calls
This step should take you about 2 minutes.
You should carry out these tests in order: they start with the lowest possible requirements and work up to testing the full system.
a) Call the Test Music extension, #803. This will show that:
- You audio out works
- The sound path from the dmSwitchboard12 works
b) Call the echo test extension, #801. This will show that:
- You audio in is working
- The sound path from the dmSwitchboard12 works
- The link quality is OK in terms of dropout and latency
c) Call your mobile phone (ensuring that your calls are not diverted to it). This shows that:
- You can make calls to the PSTN (Public Switched Telephone Network)
d) Call your personal extension DDI from another phone. This shows that:
- You can receive phone calls from the PSTN.